It’s been nearly a month, but I think I can finally call this project done! Let’s get right to the photos, shall we?
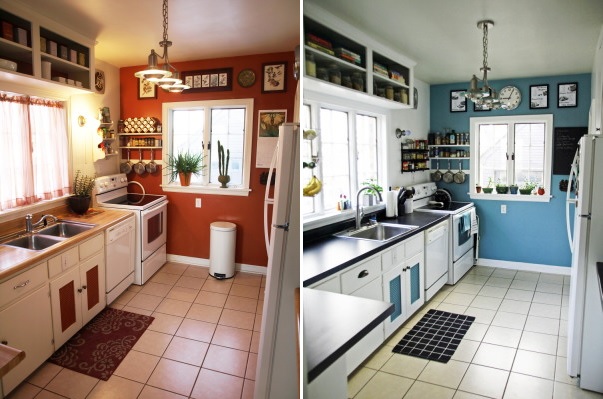
Here is the kitchen before:

Warm and sunny, but over the 12 years we’ve lived in this house, those white cupboards, which were really just painted with primer, not actual paint, got dingier and dingier and more and more like the teeth of someone who drank too much tea all their life. They needed a bleaching session.
And I’d always been bothered that the cupboard knobs and the drawer pulls were shiny rather than matte and especially that they did not actually match each other, the pulls being silver and the knobs being almost black.
Also the wood-grain-looking laminate counters had some problems, namely at the ends. On one end the endcap piece had come off, leaving the particle board interior visible when you sat at the dining room table and on the other end it didn’t meet up with the stove, so all manner of grease and particles of food made their way down to the floor, catching themselves on the dishwasher’s insulation blanket on the way.
And speaking of the dishwasher, there was nothing holding up that end of the counter but the dishwasher, which made it hard to open and shut.
These are all things you can live with, so we lived with them, knowing that kitchen renovation can be disruptive and expensive. But finally the right time came. We planned and priced things out, went with the cheaper and easy-to-care for option for the countertop, bought paint and knobs and pulls, and then settled in for at least three weeks of patching and painting during every spare moment.
And this is what we ended up with after:

Every choice we made for this project grew out of the choice of the countertops, which are laminate slate basalt (or basalt slate, I can’t remember which) which were chosen because we knew we wouldn’t ruin them, we could install them ourselves, and they would keep the costs down significantly. So the paint on the wall (Glidden, Hazy Seacliff Teal — the color is a bit off in the photo and actually looks very different in different lights) was chosen to work with the deep grey and black of the counters.
I moved my cookbooks to the top open shelves above the sink and got new spice racks. And the sink itself was kind of an odyssey.

This is the fourth one I bought. Our house was built in 1939 and these are the original cupboards, so they are smaller than today’s standard, and a standard 33″ sink will not fit. I wanted a single basin so I had room for my big pots and canners, and so that I didn’t just mindlessly fill one side with dirty dishes but instead had to empty the dishwasher. The faucet is the kind where the sprayer is built into the end and can be pulled out and retracts automatically.
The wine rack on the wall to the left in the above picture was, like the spice rack, found on Amazon after going to eleven stores looking for both. Apparently everyone has more counter space than I do and is just fine with wine and spice racks sitting there, taking up space, because not one store had a selection of wall-mounted varieties. But in a small 1939 kitchen, space is at a premium. In fact, all of my “decorations” on the walls are functional.
The things on either side of the clock above the window here are commonly used, easily adaptable recipes. The idea came to me when I was going through my cookbooks and moving them to the shelves above the sink. Two that I use more frequently than the others are binder-type cookbooks that don’t stack well and anyway I thought ought to be more accessible. But really the main things I get out of the one are the pancake and waffle recipes, which I know by heart but compulsively double check because I don’t want to confuse amounts of ingredients in my head.
So I thought, why not just make them a design element and put them on the wall?
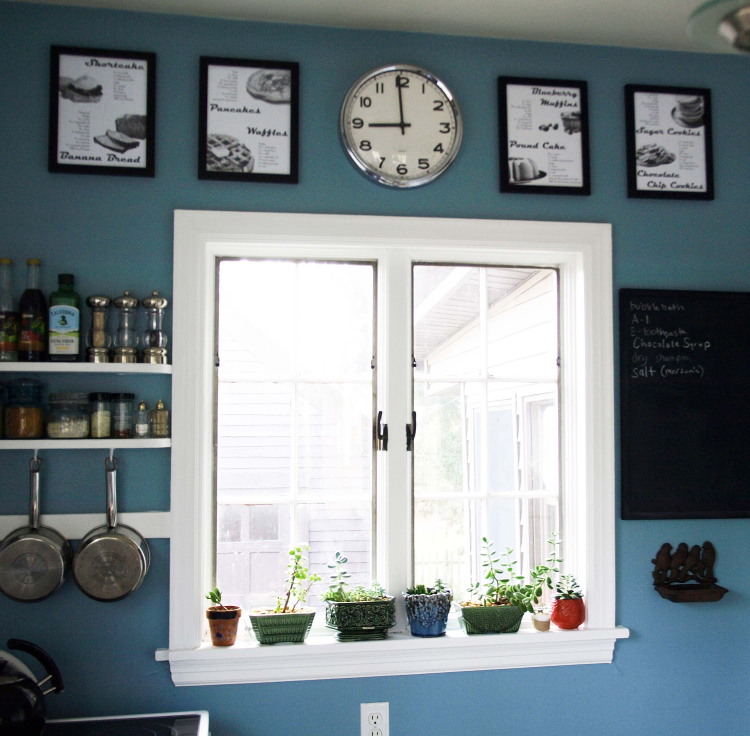
But just a couple recipes isn’t enough for decor, so I found more that, while I don’t make them frequently, I make them more frequently than others. Shortcake, banana bread, pancakes, waffles, blueberry muffins, pound cake, sugar cookies, and chocolate chip cookies. I’m hoping that having them on the wall will make me think to make some of them more often.
I also wanted a chalkboard to replace the little whiteboard on our fridge where we write all the things we’ve run out of so we know what to add to the grocery shopping list. This I also could not find in a store to save my life. Either they were too big or too small, and none of them seemed to be an actual, real chalkboard. They were largely just a flat surface that was painted black and didn’t have the feel of something that would properly interact with chalk, if you know what I mean. So again, Amazon to the rescue.
The little thing on the wall beneath it is actually a tray-style birdfeeder I’ve had there for years and that’s where the chalk and eraser go. Originally we had put our garage door opener in it, but the garage door opener has been broken for years.

One thing I had wanted for years was to move the cabinet knobs to the corners where they could more easily be reached and get the cup-style drawer pulls. This meant a lot of spackle before I could paint, especially on the drawers. The people who had this house before us had replaced the original 3 1/2″ drawer pulls with 3″ drawer pulls. But rather than spackle and drill new holes to ensure that the pulls were centered, they drilled one new hole and used one old hole and the style of the pull was such that it hid the old unused hole. So all this time, our drawer pulls have been slightly off center. And while we never noticed visually, the drawers have always been hard to pull out and push in without getting them crooked. Remember, old cupboards. There are no metal tracks that the drawers travel on — it’s just wood on wood.
So I went ahead and did it right, though it took more time of course. I also decided to remove some doors on some more of the upper cabinets entirely. I love the idea of open shelving when I see it in magazine or pinterest photos, but not for my whole kitchen. I know what’s in some of these cupboards and it isn’t pretty enough to be on display. But there is certainly room for some open shelving in my life.

Once everything was light and bright with new paint (seriously, look back over these photos at the amount of woodwork and you will see that this was indeed a laborious task) the floor looked sad and meh, and maybe someday we will tackle that (or rather have someone else tackle it) but not right now. I’d love to see it with old-style shiny hexagon tile, white with a black stripe all around the outsides and dark grout.
And looking at the pictures now I wonder if a white beadboard ceiling or even a tin ceiling would be cool. No, I don’t wonder. It would be. So sometime down the line I can see the ceiling and floor getting redone. But for now, this is quite a transformation in its own right.

Yet another talent – writer, photographer, speaker, artist and now interior designer. What will you come up with next? 🙂